 Tile floss provides a strong, waterproof, and easy-to-maintain surface, making them ideal for use in kitchens and bathrooms. However, if they’re installed on a subfloor that’s not leveled or strong, they’ll easily crack or lift from the surface. Luckily, you can solve that issue by installing uncoupling membranes.
It helps to separate or ‘uncouple’ the substrate from the tiling layer. As a result, there will be minimal stresses that can cause the tiles to crack in case of any lateral movement. Even better, these membranes have incredible waterproofing properties!
Surprisingly, despite all the benefits offered by decoupling mats, very few people know how to install them. If that’s the same topic boggling your mind, here’s how to install uncoupling membrane STEP-BY-STEP!
Tools and Materials Needed:
- Uncoupling Membrane
- Broom
- Trowels
- Utility Knife
- Safety/Protective gloves
- Power drill with a paddle attachment
- Decoupling mat thinset
- Water
- Large buckets
- Tape measure
- Roller paintbrush
Steps of Uncoupling Membrane Installation
1. Prepare the Floor
Ceramic and stone tiles are generally rigid and heavy. For that, you need to check the viability of the subfloor first before you install them. The subfloor should have adequate strength to hold the weight of the tiles and other materials used in their installation.
Consequently, the surface should be even to prevent them from loosening or cracking over time. You need to prepare the subfloor surface before you can start your uncoupling membrane and tile installation project.
To achieve that, sweep the entire surface to remove debris and dust. The process may be different from one surface to another depending on the used material.
2. Concrete Subfloor Preparation
If you’re dealing with concrete, scrub the surface with a scrub brush and a degreaser solution in warm water. This helps to get rid of any surface pollutants that may hinder the adhesives of the subfloor and uncoupling membrane.
Afterward, rinse and dry the subfloor thoroughly before you move on to the next step. In addition, use a cement patching compound to fill any holes or cracks on the concrete surface.
This simply involves applying the patching compound mixture with your trowel. However, make sure you keep the applied compound level with the surrounding concrete surface.
3. Wooden Subfloor Preparation
As part of wooden subfloor preparation, start by sliding the level around the room in various directions. This will help you determine whether there are uneven spots or dips on the floor. Next, use caulk to fill any seams, then apply a coat of latex primer-sealer with a roller brush.
After that, cover any vents near the subfloor with the painter’s tape.
Once you’re done preparing both concrete and wood subfloors, fill the dips with a self-leveling compound. As the name applies, the compound will find its level, thus creating a flat, uniform surface on drying. Remember to wear gloves and safety goggles when dealing with the self-leveling compound.
Also, let it dry completely before you install an uncoupling membrane. Note, the drying time tends to vary from one compound to another, but it usually takes several days.
4. Plan the Room
One benefit of an uncoupling membrane is that you can walk over it immediately after installation. However, it’s still a good thing to consider the layout of your room before the installation process begins.
More importantly, just like tile installation, I’d recommend that you start from the farthest point of the room and move towards the door. In addition, unroll the decoupling mat and dry cut enough pieces to cover your room with a utility knife.
However, make sure you leave about a ¼” of space around the room’s perimeter and any obstruction. Once you’ve done that, pull back the mat, wipe the floor with a slightly damp sponge and get ready to mix the thin-set mortar.
5. Mix the Then-set mortar
If you’re using an uncoupling membrane thin-set for the first time, mix a small batch and spread it on the floor with a trowel. More importantly, make sure you wear a breathing mask.
Once you get the hang of the compound, put about 3” of the powdered thin-set to an empty bucket. Then slowly add some water into the bucket and use the paddle attached to a drill to mix it. Add more water to the mixture and continue mixing until the thin-set has the right consistency.
6. Trowel it Out
Once the thin-set mortar is ready, use the notch of the trowel to spread it across the subfloor surface. While spreading the mortar, try to ensure that all the groves are running in the same direction. More importantly, make sure you apply an adequate thin-set, or else the membrane will peel off over time.
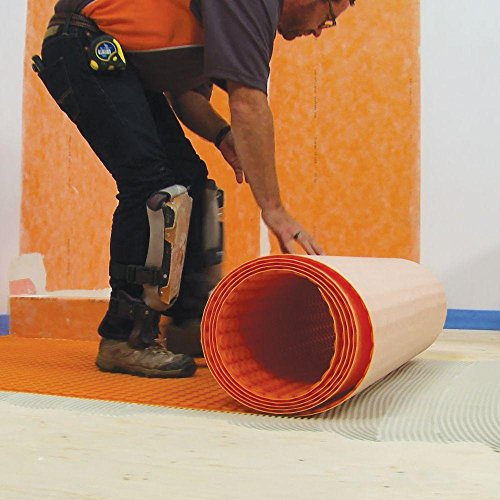
7. Install Uncoupling Membrane
While the thin-set mortar is still fresh, roll your decoupling mat back down with the fabric-side down. Press the mat firmly into the floor right away before the mortar dries.
Here, you can use a hand roller, wood float, or groat float to tap the mat down to ensure uniform distribution of pressure. If you need a high level of moisture protection tape the seams with the painter’s tape.
8. Clean up the Floor
After installing an uncoupling membrane in the entire room, properly clean up your tools. Also, let any thin-set mortar that is above the mat set, then slowly scrape it up.
To accomplish that, you can utilize the flat edge of the trowel. If you’ve any unused thin-set mortar mixture in the bucket, let it set as well.
Afterward, scrape it out and hose it off the bucket right away. That brings us to the end of the decoupling membrane installation process. All you need to do now is to let the thin-set mortar dry completely before you can install a new tile floor.
CONCLUSION
In most cases, uncoupling membrane thin-set mortars require about 24-48 hours to dry before you install tiles over the mat.
However, provided you’ve done it correctly, you can rest assured that it will extend the longevity of your tiled floor. And as you’ve seen, DIY installation of uncoupling membranes is a relatively simple task. So, depending on the type of subfloor you’ve in your house already, make sure you floor the steps above!
FAQs
1. Can I Install an uncoupling membrane over concrete?
Uncoupling mats are designed for use over concrete slabs. So, if your house has a concrete subfloor or slab, you can install them before you lay the tiles.
2. What is the best type of mortar to use when installing an uncoupling membrane?
Most uncoupling mat manufacturers recommend the use of decoupling membrane thin-set mortar when installing these mats. This unmodified, dry set bed mortar is specifically designed for use with decoupling mats and other waterproofing membranes.
3. Can I Install Tiles on the Uncoupling Membrane?
Uncoupling membranes create an optimal and waterproof surface for laying floor tiles. However, make sure you follow the manufacturer’s instructions during the installation process.
4. Can I Install an uncoupling membrane over plywood?
Apart from concrete, decoupling mats are ideal for use over various subfloor surfaces. For instance, you can install them over plywood, OSB, vinyl flooring, cement mortar, and even backer boards.